I opened a Christmas gift early (an entire week ago) and squealed with delight and excitement. Chaz got me the new iPad Mini for Christmas, wrapped it all up, and hid it under our tree. Per agreement, he also got to open one of his gift early. I'll save the photos for a later post... the facial expressions were hilarious.
No longer than 20 minutes after opening my iPad and syncing it, I thought, "I really should have a case for this," and scoured the internet. I couldn't find a funky, fun case for a decent price. So - I decided to make my own. To my amazement, it was really easy, only too me an hour to complete, and ended up being practically free. Now my iPad is super stylish and uber cozy. Since then, I've made a few other cases for friends and to gift this holiday season.
Follow the directions below to make your own iPad, iPad Mini, Kindle, or reader case:

Items needed:
- 1/2 yard of fabric
- Coordinating thread
- Thin ribbon
- 1/4" elastic ribbon
- 1 button
- Foam board or sturdy cardboard
- Sewing machine
- Needle and straight pins
- An iron
- Fabric sissors

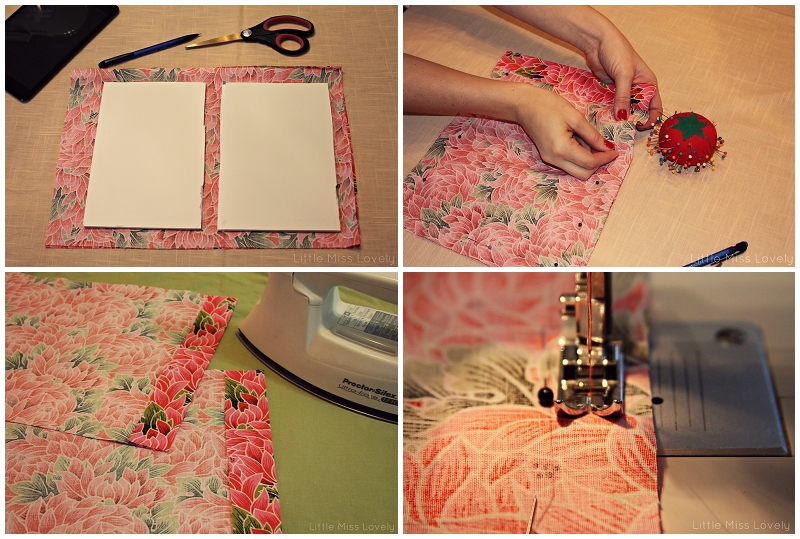
Step 1: Trace your iPad or device onto the foam board or cardboard.
Step 2: Cut two matching pieces of the foam board that are sized to your iPad or device.
Step 3: Place the foam cutouts onto your fabric (cut into two pieces, patterned sides together). Trace the foam boards onto the wrong side of the fabric using a chalk pencil or a fabric pen. Make sure that you can see the outline on the fabric.
Step 4: Cut the fabric around the foam pieces and your outline. Keep 1/2" between the foam boards and leave at least 1/2" around the edges - 1" or more on the left side.

Step 5: On the left side, fold the longer edges under and press with an iron. Make sure the patterned pieces are folder to the wrong side of the fabric. The boards should fit on the fabric with a remaining 1/2" surround.
Step 6: Pin the edges together to prep for sewing. Don't worry about pinning the left side with the folded and pressed edges just yet.
Step 7: Sew around your outline on the top, right, and bottom sides. Do not sew the left side. Leave 1/4" allowance between the outline and the seam.

Step 8: Trim the corners on the top right and bottom right seams. This will prevent your fabric from bunching up in the corners of the case.
Step 9: Turn the cover inside out (right sides showing). Slip the two foam/cardboard pieces into the open (left) end of the case. Leave an extra 1/2" in between the two boards so the cover will have some give to fold.
Step 10: Pin the left pressed edges together. Sew the edge closed.

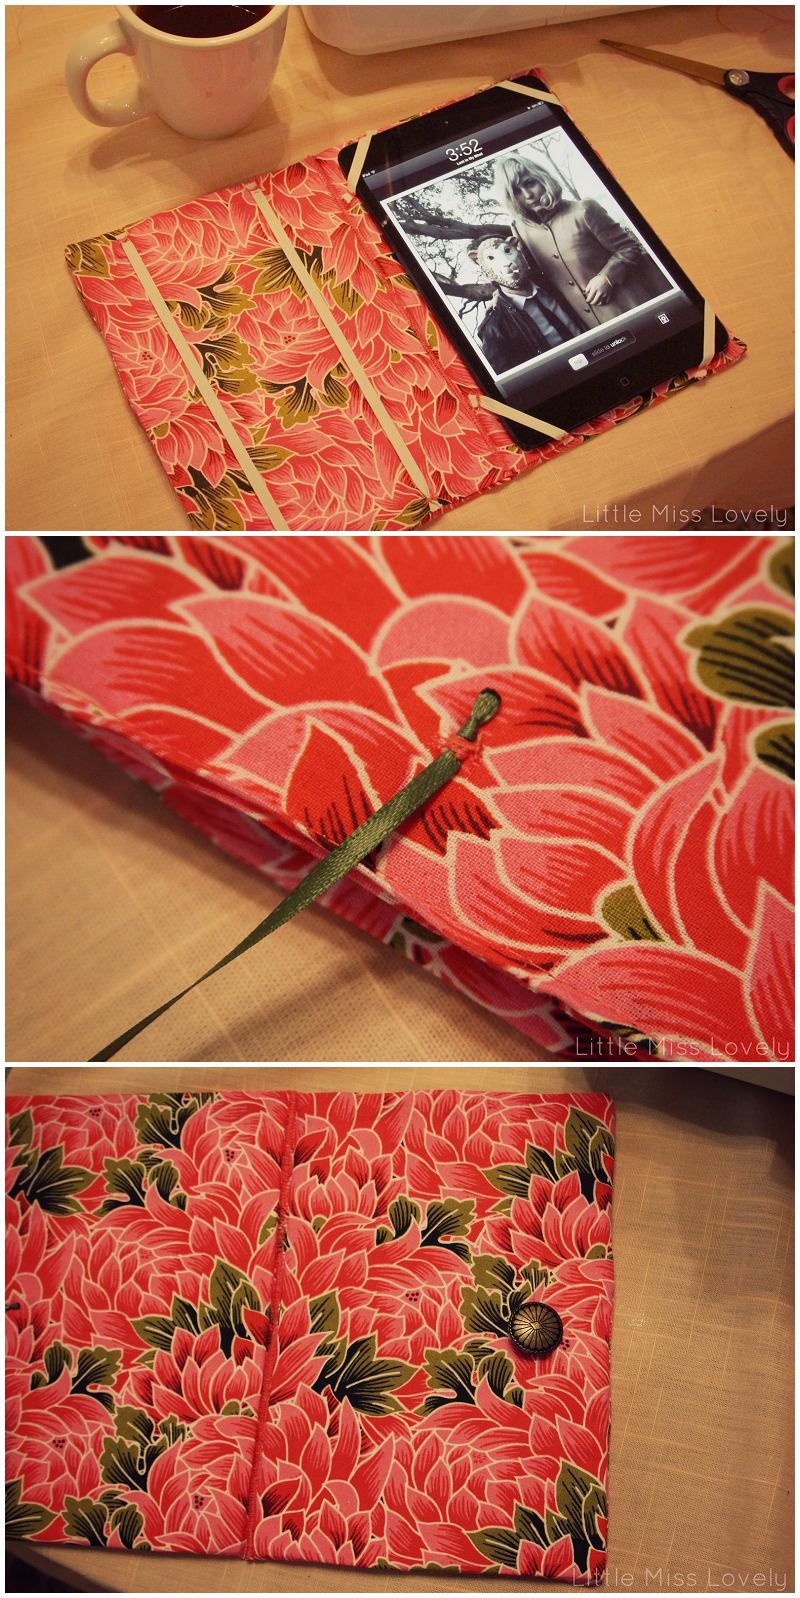
Step 11: Very carefully, run a zig-zag stitch up the middle of the case. If there isn't enough space, use a straight stitch. If wanted, run several stitched upon each other in this crevice. this will create a 'bound' effect on the covers folded spine.
Step 12: Place your elastic across the corners of the iPad or reader. Pin the elastic to the fabric where desired. This will secure the iPad to the case, so make sure they are tight enough (but not too tight that you won't be able to remove the device).
Step 13: Hand-stitch the elastic to the fabric to hold it in place. This is the most time-consuming part.

Step 14: If desired, add elastic inside the front panel. I liked this idea for storing papers, receipts, photos, etc.; things that you want to remember to look up on your device later.
Step 15: Cut a 10" piece of thin ribbon. Tie a knot in one end. If it's polyester, I suggest slightly burning the end beyond the knot to prevent it from fraying. Place the knotted end on the back side of the case, about 1.5" from the inner edge. Hand-sew this ribbon into place.
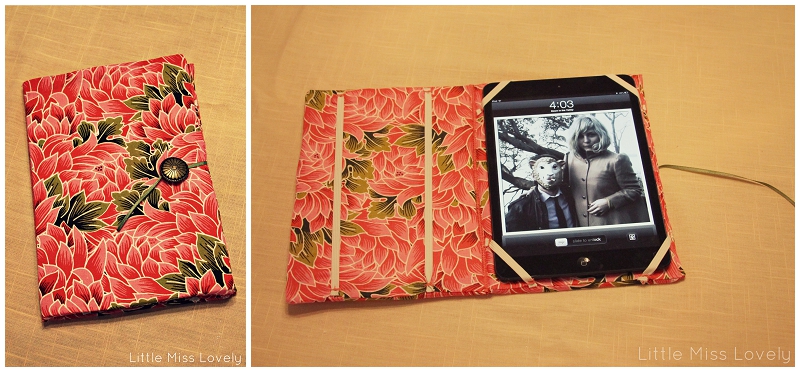
Step 16: On the front panel of the case, hand-sew a fun button about 1'5" inches from the inner edge. When closed, wrap the ribbon around the button to keep the case shut; pseudo fun, fancy journal style.

Ta da! You now have yourself one of the neatest little iPad, iPad Mini, Kindle, Nook, eReader cases ever! One that's totally one-of-a-kind, made with a fabric you love, hand-sewn, and funky fresh!
The iPad Mini case I created while doing this tutorial is going to a lovely friend of mine as a birthday gift. I chose a brightly colored Indonesian-inspired fabric (only $.97/yard!). The elastic cost me $1.26 for 3 yards at the fabric store. I pulled the button from my 'odd buttons and beads' collection. The foam board was leftover from a previous project.
All in all, I believe this case cost be about $2 to make! Only took me about 1 hour and 15 minutes to whip up, too. Crazy, right?
Before making this tutorial, I sewed myself a case out of a vintage corduroy fabric I scored at a local thrift shop. I paired it with a dark ribbon and fun silver button. I love how thick the case is and how it feels quite sturdy.
Best of luck with your sewing endeavors! Send me a photo of your hand-made finished gadget cases:
AmiReist@gmail.com. Cheers and happy holiday gift making!
Ami


I always wanted to make one. Great tutorial. A must try… oh n when I saw the head n the heart I got lil giddy. Lol.